Hardware Troubleshooting 101
I've taken the time to share my most often used fixes for common technology issues. We can call it Troubleshooting 101. When it is my turn to help you, these are the steps I follow. Now you can have the same insight into troubleshooting for those times when you want to help yourself.
Most issues with electronic hardware can be solved with a few simple troubleshooting steps. Here is a list of them, in the order you should apply them for best results.
If you've tried everything but still have an issue, you can CONTACT me for additional support.
Most issues with electronic hardware can be solved with a few simple troubleshooting steps. Here is a list of them, in the order you should apply them for best results.
If you've tried everything but still have an issue, you can CONTACT me for additional support.
Apple Mouse Scroll Ball Clean and Repair
The Apple Mouse (Apple MB112LL/B) has a tendency to stop scrolling in one direction after a certain amount of use. This is typically due to the scroll ball mechanism becoming clogged with debris.
The following is a photo tutorial of how to clean and repair the scroll ball mechanism to bring your Apple Mouse back to full functionality. I have performed this exact repair on dozens of these devices with great success. You will only need a stiff blade, small Phillips screwdriver, cyanoacrylate (super glue), rubber bands and cleaning solvent (glass cleaner is adequate) to complete this repair.
Disclaimer: read the site’s terms of use before attempting to use any information you find here. This procedure probably voids your warranty too.
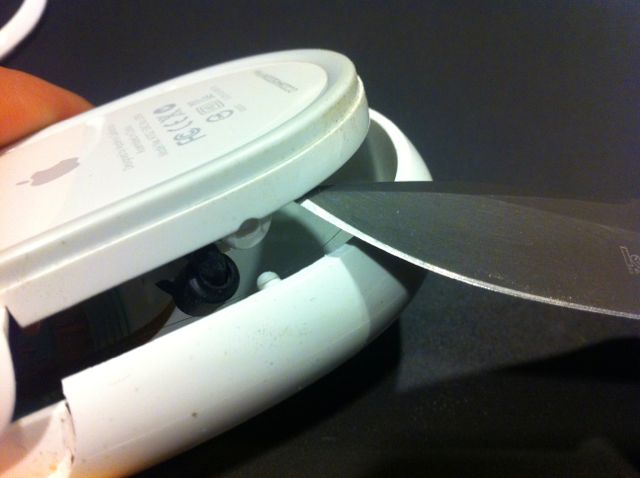
Carefully insert a stiff blade in the area shown, directly into the seam where the ring meets the body. Use the blade edge to split the ring away from the body, working it slowly and gently, breaking the glue bond section by section until the ring is no longer attached. Note that this step is probably the most difficult part of the repair, so take your time and be careful when working with a sharp blade.
If you break the ring, it is OK as you can glue it back together during the last step and will only be a cosmetic blemish.

Another common issue is the scroll ball not having any “spring” to it when depressed. The metal bar under the scroll ball is normally providing tension, but may have been bent flat from overuse. If your scroll ball is no longer “springy” use a small blade to bend the metal tension bar up and away from the grey base plate. That should help put more pressure on the scroll ball once the white clip is reassembled.
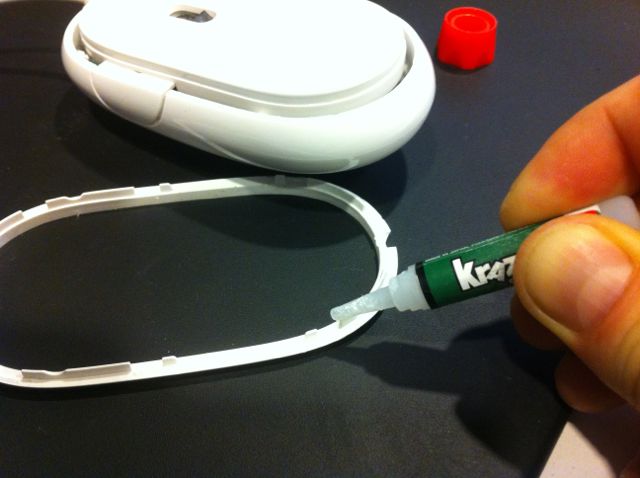
Next is the final gluing of the outer ring. Hopefully you have done a good job with cleaning and testing, because cyanoacrylate is a permanent adhesive. You only need to use 6 small drops of glue on each of the previous glue points. If you use too much glue, removing the ring for future repairs will be near impossible.
Congratulations, you just saved yourself about $50, or the cost of replacing the Apple Mouse.
The following is a photo tutorial of how to clean and repair the scroll ball mechanism to bring your Apple Mouse back to full functionality. I have performed this exact repair on dozens of these devices with great success. You will only need a stiff blade, small Phillips screwdriver, cyanoacrylate (super glue), rubber bands and cleaning solvent (glass cleaner is adequate) to complete this repair.
Disclaimer: read the site’s terms of use before attempting to use any information you find here. This procedure probably voids your warranty too.
1. Remove Outer Ring
First start by turning the mouse over and locating the glued on outer ring. Note this is a white plastic ring, not the inner grey rubberized ring. To remove the white outer plastic ring, the glue bonds must be broken to free it from the outer mouse body. Since the plastic ring is thin and brittle, great care must be taken at this step.Carefully insert a stiff blade in the area shown, directly into the seam where the ring meets the body. Use the blade edge to split the ring away from the body, working it slowly and gently, breaking the glue bond section by section until the ring is no longer attached. Note that this step is probably the most difficult part of the repair, so take your time and be careful when working with a sharp blade.
If you break the ring, it is OK as you can glue it back together during the last step and will only be a cosmetic blemish.
2. Separate Body From Base
Next locate the hinge area, and pry the inner base away from the outer body. The peg and hole are visible in the image below. Since the outer body plastic is flexible, the prying motion is enough to pop out the peg from the hole, freeing the base.3. Clean Internal Surfaces
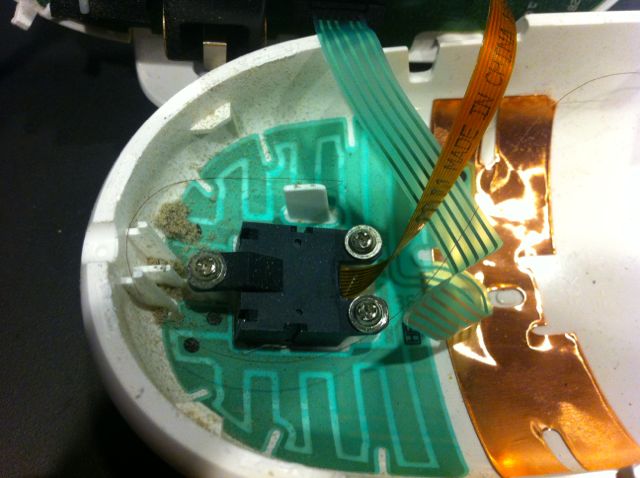
With the halves separated, the debris inside the mouse may be visible. In this particular mouse, we see a large amount of dead skin cells and some hair. Vacuum, wipe, blow or otherwise remove all foreign material from the interior cavities as this is the culprit that is jamming up the scroll ball mechanism.4. Disconnect Ribbon Cables
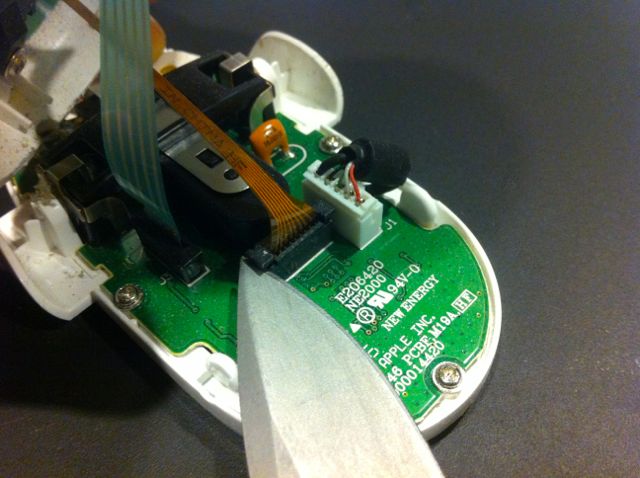
Next use a small blade to pry up the retaining tabs on the ribbon cable sockets. Be gentle with these and pry up both sides equally if possible. Once they are fully lifted up, the ribbon cable will come out of the socket quite easily.5. Unscrew Scroll Ball Mechanism Housing
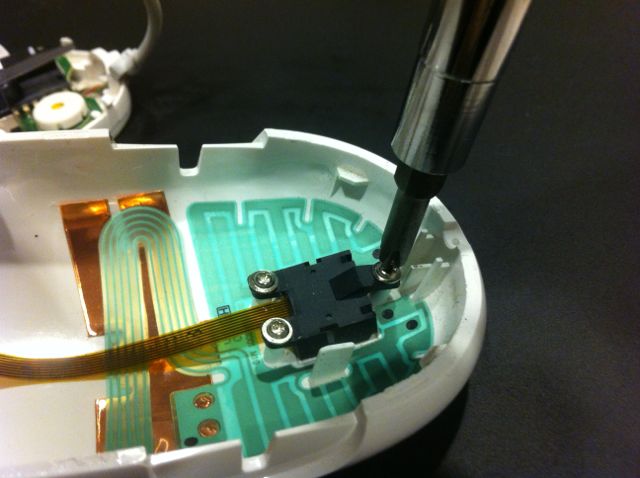
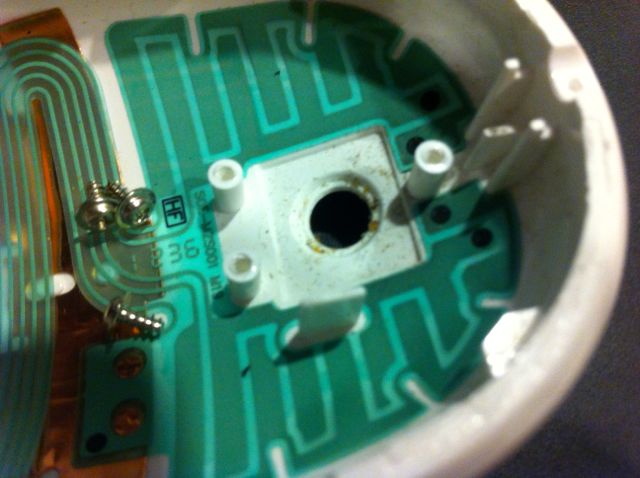
Use the Phillips head screwdriver to remove the three screws retaining the scroll ball mechanism housing.6. Clean Scroll Ball Access Hole
Note any debris stuck between the scroll ball mechanism and the outer body, and clean them thoroughly.7. Disassemble Scroll Ball Mechanism
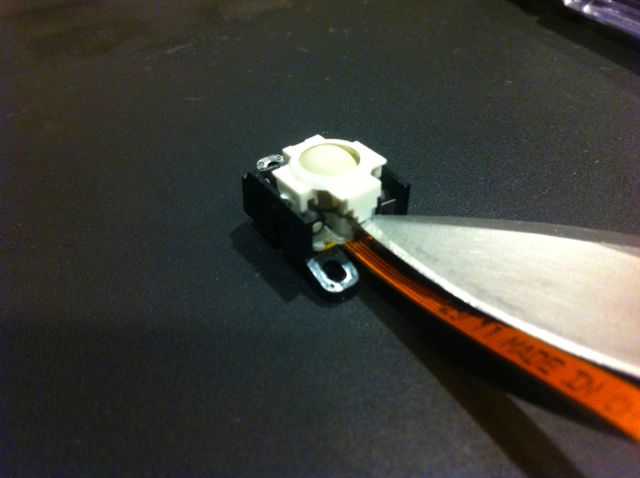
Release the white clip retaining the scroll ball by inserting a small blade under the tab like indicated in the photo below. The white clip is delicate and has several small posts on its interior side so be very gentle with it.8. Clean Scroll Ball, Clip and Rollers
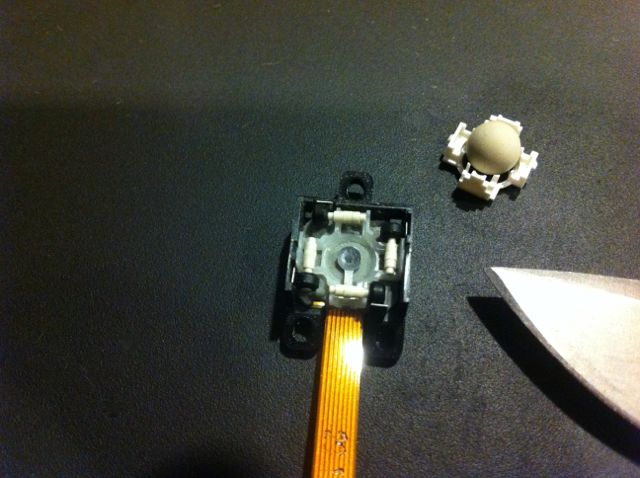
With the white clip and ball removed, we can see the four axis rollers, and the metal scroll ball tensioner bar. All of these parts are responsible for tracking scroll input and must be cleaned meticulously. Use any liquid cleaners safe for plastic, like glass cleaner, and be sure to get all the little nooks and crannies too. Take care not to get the black and grey plastic housing with ribbon cable wet, as it contains electronic components.Another common issue is the scroll ball not having any “spring” to it when depressed. The metal bar under the scroll ball is normally providing tension, but may have been bent flat from overuse. If your scroll ball is no longer “springy” use a small blade to bend the metal tension bar up and away from the grey base plate. That should help put more pressure on the scroll ball once the white clip is reassembled.
9. Reassemble and Test
Now reassemble the mouse by reversing the steps taken so far. Now is a good time to test the mouse to ensure your cleaning worked, and that you have remembered to connect the two internal ribbon cables securely.Next is the final gluing of the outer ring. Hopefully you have done a good job with cleaning and testing, because cyanoacrylate is a permanent adhesive. You only need to use 6 small drops of glue on each of the previous glue points. If you use too much glue, removing the ring for future repairs will be near impossible.
10. Glue and Dry
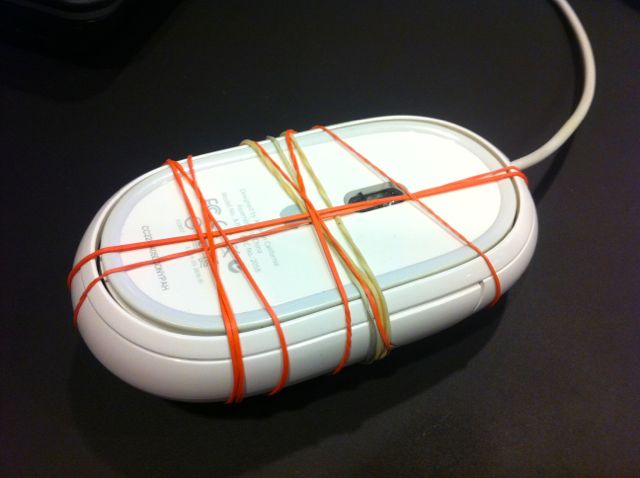
Use rubber bands to secure the outer ring onto the body and allow time for the glue to dry completely.Congratulations, you just saved yourself about $50, or the cost of replacing the Apple Mouse.
Raspberry Pi Passive Cooling Mods
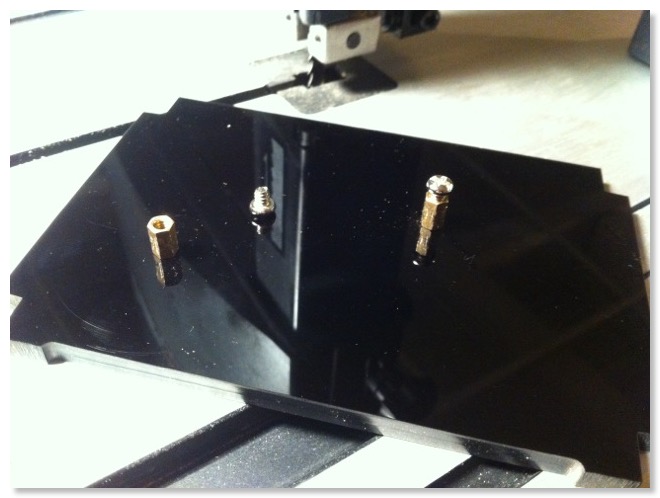
Black acrylic base tapped with motherboard standoffs and screws.
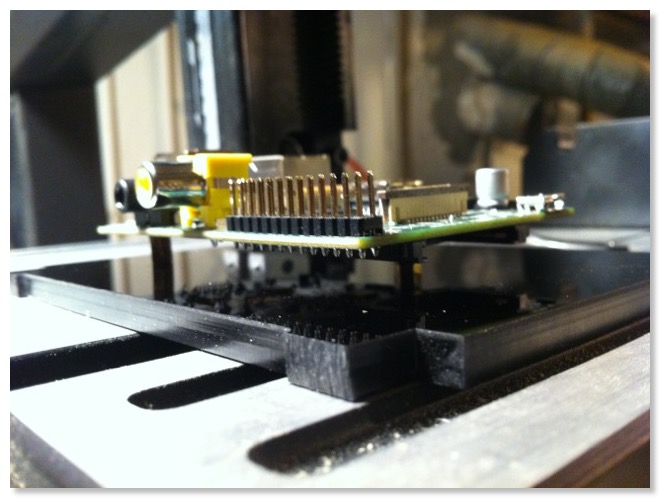
Raspberry Pi attached to stable cassis, showing clearance for airflow.

Old Pentium-era heatsink cut with jeweler’s saw, filed and lapped for best surface area contact with the chips.
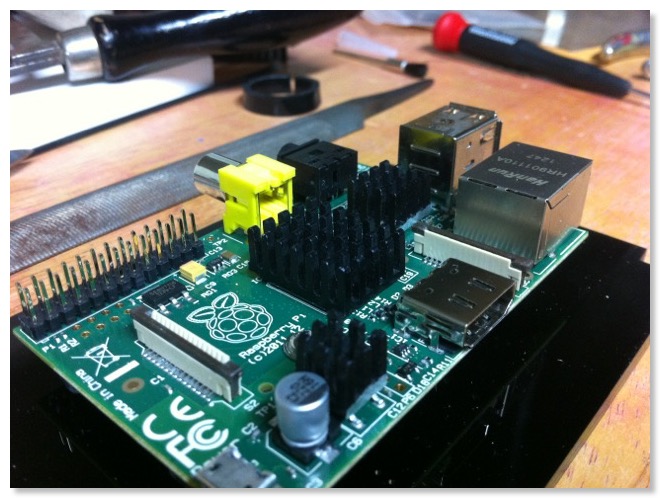
Heatsinks adhered to chipsets with cyanoacrylate and thermal compound. Overclocking past 1.0GHz is now possible.
M-Audio Studiophile BX5 Capacitor Replacement
Faulty capacitors have frustrated many a consumer in the form of nonfunctional devices all across the world. While the plague seems to mostly be behind us, there are still some devices out there that have capacitors that are doomed to fail prematurely. Unfortunately I had some bad caps in one of my favorite electronic devices ever: M-Audio Studiophile BX5 powered monitors.
While this is not a review of the BX5 powered speakers, I can not resist describing how incredible these speakers sound. The relatively small 5" and 1" drivers and discrete amplifiers provide smooth waveforms and dedicated reproduction of sound without the added coloration of most speaker systems. In other words, you hear what the sound engineers in the studio heard, making for an accurate listening experience.
So when one of the speakers failed to turn on, I panicked. I did all the Troubleshooting 101 steps first. Check cables and power? Swap cables, try different outlets? It didn't matter, the left speaker was nonfunctional, with no power LED.
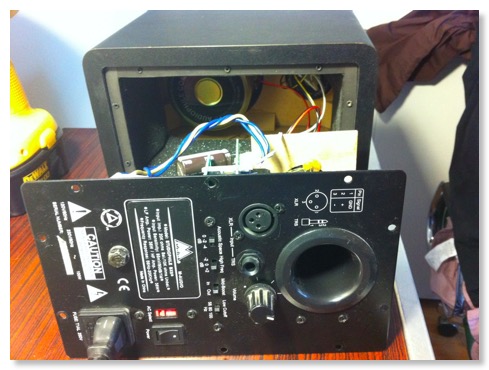
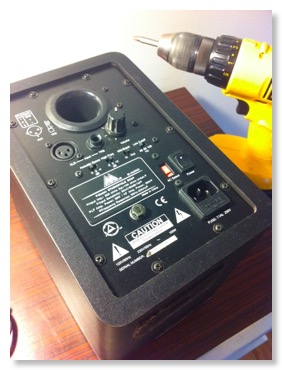 Refusing to admit defeat, I did what any proper geek would do. Disassemble and inspect, then perform repairs. I had fixed many devices in the past, but never a powered speaker. The delicate speaker cone surounds were intimidating in their fragility and I did not want to destroy these beauties due to a slip or other mistake. So I carefully prepared a working surface and got some tools ready for disassembly. 10 outer Phillip's head screws needed to be removed to expose the backplane.
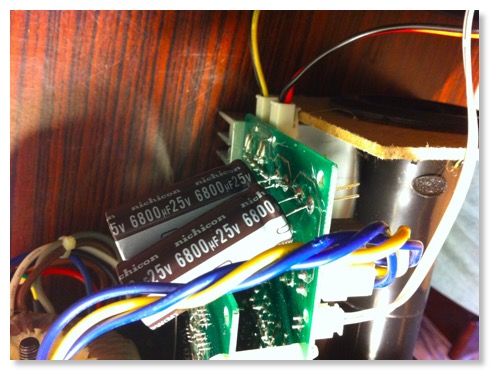
This is when I discovered the failed capacitors. They had electrolyte clearly leaking out of them and their top surfaces were slightly bulged, a definite indication of failure.
Here is what was required for the replacement:
DigiKey part # 493-1846-ND
CAP 6800UF 25V ELECT PW RADIAL
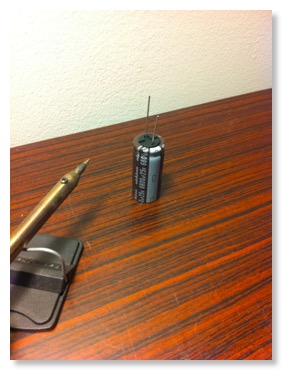 There are two of these capacitors in each cabinet, so a full replacement required four total capacitors. I ordered all four at once, knowing that the other two capacitors were also doomed to failure.
The above parts and an inexpensive soldering iron are all that was needed. Some people will say you need a desoldering braid or other equipment but I've learned to do without.
As it turned out, the DigiKey capacitors were slightly longer than the ones I was replacing, which required them to be mounted on the other side of the PCB. Just make sure the polarity is correct and this will be fine. No one sees the inside of the cabinet once it is all screwed back together.
Upon testing, I had success! The studio monitors were as good as new, better even, as the new caps are not flawed ones doomed to premature failure. Although one speaker did stop working some weeks later, it was simply due to a cold solder joint, which was easily fixed by reflowing the solder. In light of that, double check all your connections with a multimeter and ensure you have adequate solder and clean contacts the first time around.
Have you done a repair to your own electronics? If so you may want to submit your work log to iFixIt.com
While this is not a review of the BX5 powered speakers, I can not resist describing how incredible these speakers sound. The relatively small 5" and 1" drivers and discrete amplifiers provide smooth waveforms and dedicated reproduction of sound without the added coloration of most speaker systems. In other words, you hear what the sound engineers in the studio heard, making for an accurate listening experience.
So when one of the speakers failed to turn on, I panicked. I did all the Troubleshooting 101 steps first. Check cables and power? Swap cables, try different outlets? It didn't matter, the left speaker was nonfunctional, with no power LED.
This is when I discovered the failed capacitors. They had electrolyte clearly leaking out of them and their top surfaces were slightly bulged, a definite indication of failure.
Here is what was required for the replacement:
DigiKey part # 493-1846-ND
CAP 6800UF 25V ELECT PW RADIAL
The above parts and an inexpensive soldering iron are all that was needed. Some people will say you need a desoldering braid or other equipment but I've learned to do without.
As it turned out, the DigiKey capacitors were slightly longer than the ones I was replacing, which required them to be mounted on the other side of the PCB. Just make sure the polarity is correct and this will be fine. No one sees the inside of the cabinet once it is all screwed back together.
Upon testing, I had success! The studio monitors were as good as new, better even, as the new caps are not flawed ones doomed to premature failure. Although one speaker did stop working some weeks later, it was simply due to a cold solder joint, which was easily fixed by reflowing the solder. In light of that, double check all your connections with a multimeter and ensure you have adequate solder and clean contacts the first time around.
Have you done a repair to your own electronics? If so you may want to submit your work log to iFixIt.com
Lian Li PC6070 Quiet Air Intake Project
I've been using a Lian Li PC6070 aluminum computer case for a number of years now for a file server and CAD/CAM workstation and am still satisfied with its performance. It is large enough to house a good number of drives and accessories while providing decent cooling. However, as the inside of the system became hotter and more crowded after numerous upgrades I decided to try to improve the cooling ability while silencing the fans with some of my own modifications.
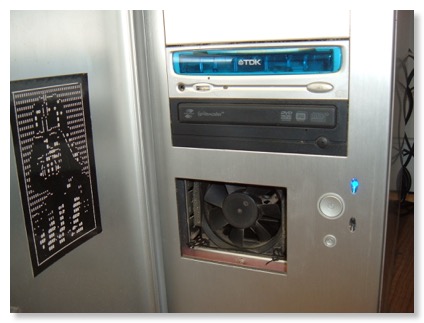
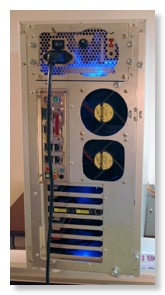 The first change involved cutting another 80mm exhaust fan hole. Lian Li decided to only use one fan for exhaust, even though there was room for two. After some cutting with a jeweler's saw and some cleanup with a metal file I reinstalled the fans. This effectively doubled the exhaust airflow around the CPU area. The hole I created is the lower, rounded rectangle shaped hole (pictured left). I could not use a circular hole pattern because two circular holes would have overlapped and caused a weak point in the aluminum backplane.
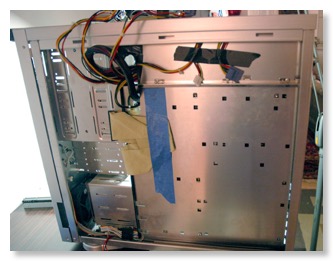
The next modifications took place about two years later. I wanted to hold on to this case because of it's premium features but felt like the design was showing it's age. For one, cable management was becoming an issue with four hard drives installed. The rounded IDE cable craze had come and gone (mostly due to SATA cables being much thinner) and the motherboard tray design did not allow for any fancy cable routing. There was also an issue with the front intake becoming clogged with dust, since it faced down much like a vacuum cleaner.
So I went back to work, with a cordless drill and the jeweler's saw. I cut a hole in the motherboard tray to allow unused power cables to be routed out of sight, and taped down (shown below).
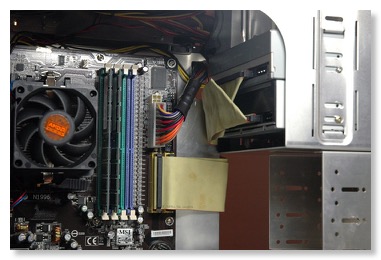
Next, the IDE ribbon cables received a special dose of cablegami (shown below).
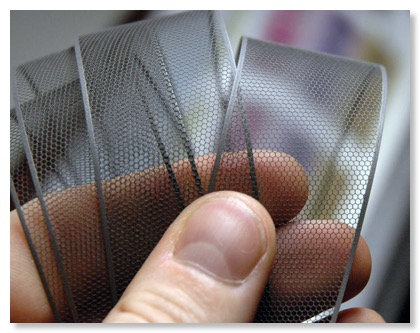
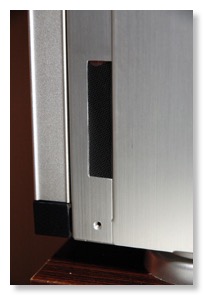 Next, I sealed off the bottom intake holes with cardboard and masking tape, and created new vents in the side of the front bezel. To filter out the dust, metal mesh filters were reused from a Xerox DocuColor laser printer (shown at left).
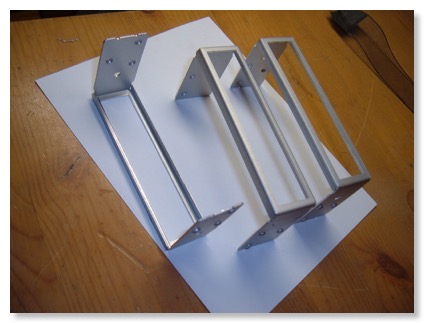
I've recently replaced all the original 80mm case fans in addition to the 120mm PSU fan. I guess they lasted as long as they should have considering they spun 24 hours a day for almost 5 years. The new fans are low noise, rubber dampened units from Silverstone and Scythe, respectively. Since these fans spin at a low RPM, I needed to increase the intake surface somewhat to compensate for the lower pressurization. I decided to use the three 3.5" drive bay covers since I could fit an 80mm fan directly behind them, and directly in front of the two Samsung Spinpoint hard drives currently in the system. I again used the Xerox toner screens for dust filtration.
The three bay covers after I sawed a large rectangle out of each of their faces (below).
View of the 80mm fan, for hard drive air intake (below).
Detail of the discarded Xerox toner filters to be reused as intake filters (below).
 Here is the finished drive bay intake (at left) with the filters in place. They pop out easily and can be cleaned by running them under water or using compressed air.
Despite having quieter, lower RPM fans, the result was increased cooling capacity and overall lower noise. Not pictured are other sound deadening enhancements like electrical tape and rubber grommets on metal mating surfaces (especially the hard drive cage and mounts) to reduce vibration.
The next modifications took place about two years later. I wanted to hold on to this case because of it's premium features but felt like the design was showing it's age. For one, cable management was becoming an issue with four hard drives installed. The rounded IDE cable craze had come and gone (mostly due to SATA cables being much thinner) and the motherboard tray design did not allow for any fancy cable routing. There was also an issue with the front intake becoming clogged with dust, since it faced down much like a vacuum cleaner.
So I went back to work, with a cordless drill and the jeweler's saw. I cut a hole in the motherboard tray to allow unused power cables to be routed out of sight, and taped down (shown below).
Next, the IDE ribbon cables received a special dose of cablegami (shown below).
I've recently replaced all the original 80mm case fans in addition to the 120mm PSU fan. I guess they lasted as long as they should have considering they spun 24 hours a day for almost 5 years. The new fans are low noise, rubber dampened units from Silverstone and Scythe, respectively. Since these fans spin at a low RPM, I needed to increase the intake surface somewhat to compensate for the lower pressurization. I decided to use the three 3.5" drive bay covers since I could fit an 80mm fan directly behind them, and directly in front of the two Samsung Spinpoint hard drives currently in the system. I again used the Xerox toner screens for dust filtration.
The three bay covers after I sawed a large rectangle out of each of their faces (below).
View of the 80mm fan, for hard drive air intake (below).
Detail of the discarded Xerox toner filters to be reused as intake filters (below).
Despite having quieter, lower RPM fans, the result was increased cooling capacity and overall lower noise. Not pictured are other sound deadening enhancements like electrical tape and rubber grommets on metal mating surfaces (especially the hard drive cage and mounts) to reduce vibration.
Hard Disk Actuator Keychain

Geeky conversation pieces made from hard drive actuators. To the uninitiated they looked like car keys from the future.
Would you like to own an original? This item is now for sale in my online store here.