M-Audio Studiophile BX5 Capacitor Replacement
Faulty capacitors have frustrated many a consumer in the form of nonfunctional devices all across the world. While the plague seems to mostly be behind us, there are still some devices out there that have capacitors that are doomed to fail prematurely. Unfortunately I had some bad caps in one of my favorite electronic devices ever: M-Audio Studiophile BX5 powered monitors.
While this is not a review of the BX5 powered speakers, I can not resist describing how incredible these speakers sound. The relatively small 5" and 1" drivers and discrete amplifiers provide smooth waveforms and dedicated reproduction of sound without the added coloration of most speaker systems. In other words, you hear what the sound engineers in the studio heard, making for an accurate listening experience.
So when one of the speakers failed to turn on, I panicked. I did all the Troubleshooting 101 steps first. Check cables and power? Swap cables, try different outlets? It didn't matter, the left speaker was nonfunctional, with no power LED.
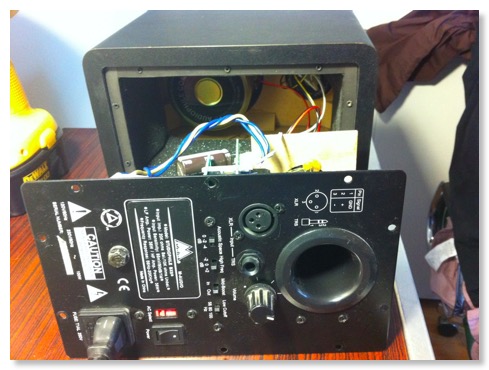
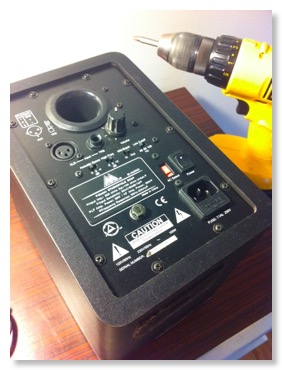 Refusing to admit defeat, I did what any proper geek would do. Disassemble and inspect, then perform repairs. I had fixed many devices in the past, but never a powered speaker. The delicate speaker cone surounds were intimidating in their fragility and I did not want to destroy these beauties due to a slip or other mistake. So I carefully prepared a working surface and got some tools ready for disassembly. 10 outer Phillip's head screws needed to be removed to expose the backplane.
This is when I discovered the failed capacitors. They had electrolyte clearly leaking out of them and their top surfaces were slightly bulged, a definite indication of failure.
Here is what was required for the replacement:
DigiKey part # 493-1846-ND
CAP 6800UF 25V ELECT PW RADIAL
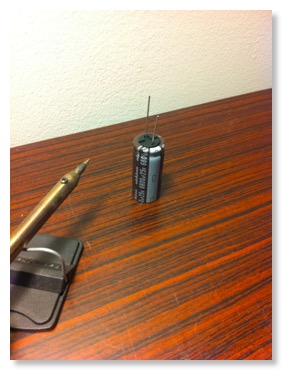 There are two of these capacitors in each cabinet, so a full replacement required four total capacitors. I ordered all four at once, knowing that the other two capacitors were also doomed to failure.
The above parts and an inexpensive soldering iron are all that was needed. Some people will say you need a desoldering braid or other equipment but I've learned to do without.
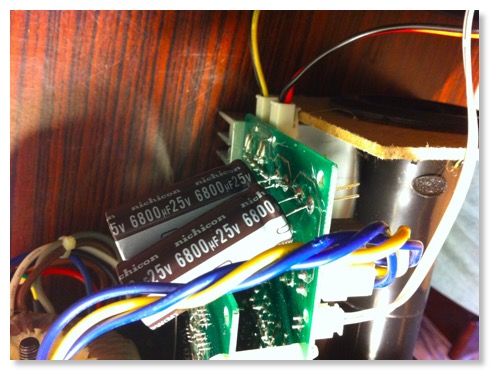
As it turned out, the DigiKey capacitors were slightly longer than the ones I was replacing, which required them to be mounted on the other side of the PCB. Just make sure the polarity is correct and this will be fine. No one sees the inside of the cabinet once it is all screwed back together.
Upon testing, I had success! The studio monitors were as good as new, better even, as the new caps are not flawed ones doomed to premature failure. Although one speaker did stop working some weeks later, it was simply due to a cold solder joint, which was easily fixed by reflowing the solder. In light of that, double check all your connections with a multimeter and ensure you have adequate solder and clean contacts the first time around.
Have you done a repair to your own electronics? If so you may want to submit your work log to iFixIt.com
While this is not a review of the BX5 powered speakers, I can not resist describing how incredible these speakers sound. The relatively small 5" and 1" drivers and discrete amplifiers provide smooth waveforms and dedicated reproduction of sound without the added coloration of most speaker systems. In other words, you hear what the sound engineers in the studio heard, making for an accurate listening experience.
So when one of the speakers failed to turn on, I panicked. I did all the Troubleshooting 101 steps first. Check cables and power? Swap cables, try different outlets? It didn't matter, the left speaker was nonfunctional, with no power LED.
This is when I discovered the failed capacitors. They had electrolyte clearly leaking out of them and their top surfaces were slightly bulged, a definite indication of failure.
Here is what was required for the replacement:
DigiKey part # 493-1846-ND
CAP 6800UF 25V ELECT PW RADIAL
The above parts and an inexpensive soldering iron are all that was needed. Some people will say you need a desoldering braid or other equipment but I've learned to do without.
As it turned out, the DigiKey capacitors were slightly longer than the ones I was replacing, which required them to be mounted on the other side of the PCB. Just make sure the polarity is correct and this will be fine. No one sees the inside of the cabinet once it is all screwed back together.
Upon testing, I had success! The studio monitors were as good as new, better even, as the new caps are not flawed ones doomed to premature failure. Although one speaker did stop working some weeks later, it was simply due to a cold solder joint, which was easily fixed by reflowing the solder. In light of that, double check all your connections with a multimeter and ensure you have adequate solder and clean contacts the first time around.
Have you done a repair to your own electronics? If so you may want to submit your work log to iFixIt.com